• Skip to primary navigation
  • Skip to main content
  • Skip to primary sidebar
  • Skip to footer

Girl Loves Glam

  • Home
  • Hair
    • Hair Care
    • Hair Reviews
    • Curly Hair
    • Kids’ Hair
    • Hairstyles
  • Makeup
    • Makeup Tips
    • Album Cover Makeup
    • Makeup Looks
    • Makeup Reviews
    • Nails
    • Skincare
  • Create
    • Silhouette Projects
    • Decor
    • Kid Crafts
    • Recipes
    • Printables
    • Bath Bombs
    • DIY Beauty
    • Organization
    • Disney
  • Holiday
    • Summer
    • Thanksgiving
    • Fall
    • Birthday
    • Spring
    • Winter
    • Valentine’s Day
    • St. Patrick’s Day
    • Easter
    • 4th of July
    • Halloween
      • Halloween Costumes
      • Halloween Decor
      • Halloween Recipes
      • Halloween Activities
    • Christmas
      • Christmas Decor
      • Christmas Activities
      • Christmas Recipes
  • Life
    • Motherhood
    • Miscarriage
    • Health
    • Acanthamoeba Parasite
    • Faith
    • Music
    • Style
    • Travel
  • Contact
  • Shop
    • Amazon Favorites
    • Color Street Nails

How to cut your own side “swoop” bangs

April 16, 2013 By McKenzie 38 Comments

76shares
  • Share
  • Tweet

As a cosmetologist, one concern I hear over and over again is that people really want to try side swoop bangs, but they don’t want to have to come get their bangs trimmed every 3 weeks to maintain them. I usually teach them a few tricks to help them maintain the look so that they don’t need to come back until they need a full haircut. I wanted to have some side swoop bangs before I going to Snap, so of course, I decided to take pictures along the way so that you can ALL know how to cut your own side swoop bangs at home!

How to cut your own side swoop bangs at home on www.girllovesglam.com #diy #hair #cut #tutorial

You will need…

*hair scissors

*comb

*styling tools

Before you start, be sure that your bangs are dry and straight. If you cut them while they are wet, bangs tend to shrink a little when they dry and they become shorter than you had originally planned. NOT good!

Cut your own side swoop bangs at home on www.girllovesglam.com #diy #hair #bangs #tutorial

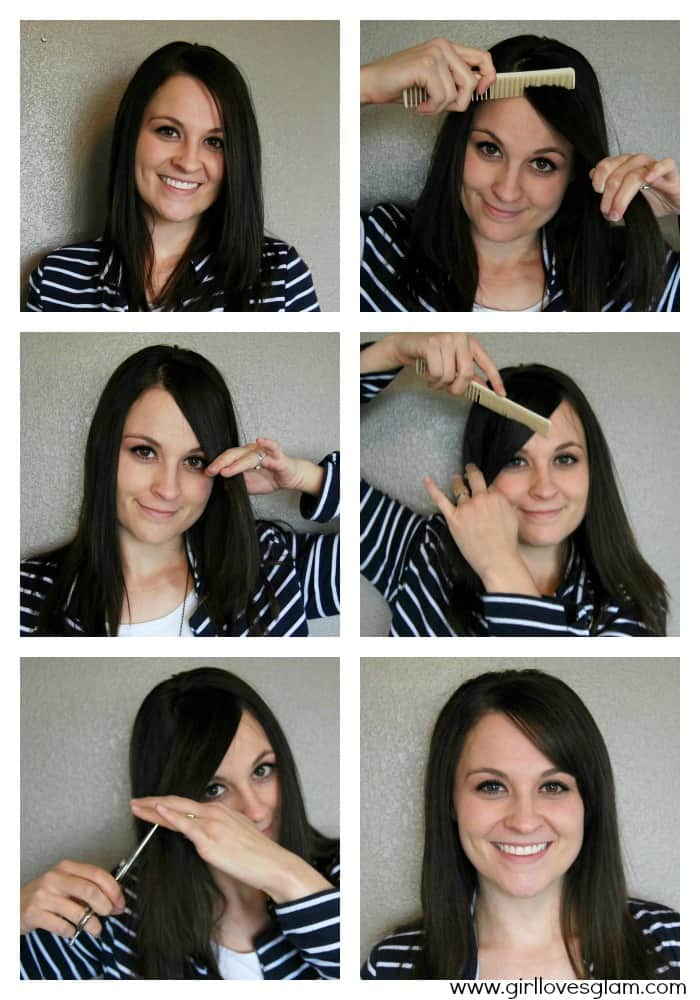
Follow along with me through these pictures.

1. Part off as much hair as you want included in your bangs. If you want them to be thin, don’t take as much hair. If you want thick bangs, take a bigger section of hair. Keep in mind what your hair texture is like when choosing. My hair is thick, so a medium/thicker bang works well with my hair.

2. Choose where you want your bangs to hit on the side of your face.

3. Brush the section of hair you are working with to the opposite side of your face (Random information: This is also known as taking it across the street in beauty school). Put your fingers where you want your bangs to hit when you pull that hair back over to where you want them to be.

4. Using your fingers as a guide, cut your hair along where your fingers are, keeping your hair pulled the opposite direction that they will be. I like to point cut my bangs, meaning that I don’t cut straight across. I hold the scissors up and down and cut that way. It makes for a less dramatic line. Keep in mind, that could be a little more advanced and could be dangerous to cut towards your fingers. BE SO CAREFUL not to cut your fingers! You can also just cut straight across if that is easier/safer for you.

5. Brush your bangs over to where you want them to be. Style them how you want them.

All done! Enjoy your beautiful side swoop bangs!

I know you will LOVE these other great hair tutorials too! Click on the photos to take you to these posts…

Cut Your Own Split Ends

At Home Hair Coloring Tips

Perfectly Tousled Curls

Filed Under: Hair Tagged With: bangs, diy, haircut, tutorial, tutorials

Previous Post: « Our Love Story Part 3: The First Date
Next Post: WIW: All Dressed Up with Hanes »

Reader Interactions

Comments

  1. Jess @ Spool and Spoon

    April 16, 2013 at 12:14 pm

    You are brave! I don’t mind trimming my bangs but cutting my hair completely scares the buhjeezus out of me! Your bangs turned out way too cute though <3

    Reply
  2. Kristen Hills

    April 20, 2013 at 2:17 pm

    Oh Man! That is AWESOME!!!! I’m kind of a chicken… I should have had you cut mine at SNAP!

    Reply
  3. mary

    April 23, 2013 at 9:44 pm

    never heard of combing them to the opposite side for cutting! Maybe that’s why my bangs never turn out quite right! Now I have to wait a few more weeks to try this since I just took scissors to them the other day!

    Reply
    • McKenzie

      April 24, 2013 at 9:17 pm

      It is the safest way there is! Good luck!

      Reply
  4. Lisa at Pebbles and Piggytails

    April 23, 2013 at 8:52 pm

    Holy Cow! You have just saved my life with this! I cannot tell you how many times I try to cut my bangs and it turns out bad. THANK YOU SO MUCH!!!

    Reply
    • McKenzie

      April 24, 2013 at 9:17 pm

      I am glad I could help!

      Reply
  5. Capturing Joy with Kristen Duke

    April 24, 2013 at 8:43 pm

    nice tips!!! i gotta work up the nerve to do it now

    Reply
    • McKenzie

      April 24, 2013 at 9:17 pm

      You can do it!

      Reply
  6. Danielle

    April 25, 2013 at 11:57 am

    Such a great article, and just when my bangs were needed a little TLC 🙂 Thanks so much for sharing!!!

    Reply
  7. domestic bliss squared

    April 26, 2013 at 6:28 am

    Great info! Thank you so much, I have bangs I’ve been trying to grow out for a while and this looks like a cute way to do it…myself!

    Reply
  8. Vanessa @ See Vanessa Craft

    April 27, 2013 at 6:59 am

    If only I was that brave and talented! Love your bangs though! Thanks so much for stopping by Do Something Crafty Friday!

    Reply
  9. Lisa

    April 27, 2013 at 8:25 pm

    Great tutorial!!! I’m a bit scared, but I want to try!

    Reply
  10. Carol

    April 28, 2013 at 6:36 pm

    I just did this and I have no talent when it comes to dealing with my thick, coarse, wavy/curly hair. I like it! I saw it on I Heart Naptime’s Top 20, right before I colored my hair this morning. I had to mull it over a bit before I actually did it though. Thanks for the directions that even this klutz could follow!

    Reply
  11. Marcy @ day2day SuperMom

    May 4, 2013 at 4:26 pm

    Wow! I had no idea it’s best to cut on the opposite side! Thanks for this great tip ~ and for sharing at the 6 Sisters Party! PIN’d!

    Reply
  12. amy

    May 5, 2013 at 4:56 pm

    So, I followed this tutorial yesterday!! Yay! I’m growing out my hair, which I love, but my bangs were starting to not look like bangs anymore! I used your tricks and they turned out great!! Thanks a million! Can I ask what the purpose of putting them over on the other side to cut them is? I notice that my hairdresser does it too…just curious as to why that works!

    Reply
    • McKenzie

      May 6, 2013 at 7:46 am

      I am SO glad it helped! There are a few reasons why you should pull them across. It makes it so you don’t cut them too short because they are being stretched across your face as you cut them. Another reason is because it creates a nice angle that gets cut so you don’t have to try to cut your bangs at an angle. Thanks!

      Reply
  13. Pam

    May 5, 2013 at 6:33 pm

    Definitely going to try this. Hope you don’t mind, but I’m pinning…

    Reply
  14. bumblebee

    July 1, 2013 at 7:09 pm

    My hair is short and (sorta) curly. Are bangs good for me or a no no?

    Reply
    • McKenzie

      July 3, 2013 at 11:43 am

      Bangs would work if you are willing to straighten your bangs. It really depends on what your face shape is like too!

      Reply
  15. Caylnn

    August 24, 2013 at 9:42 pm

    You are awesome! This tutorial was so easy! Hair is my worst enemy. We never get along. Especially bangs. I’ve tried swoop bangs because they’re so cute but no one could ever get the cut right. I literally found this just now, walked into my bathroom and snip! They’re adorable ♥ Thank youuu!

    Reply
    • McKenzie

      August 24, 2013 at 10:18 pm

      I’m so glad that I could help!

      Reply
  16. ekta

    September 27, 2013 at 5:10 am

    some people twist and then cut bangs! what does twisting do?

    Reply
    • McKenzie

      September 28, 2013 at 9:21 pm

      If you twist correctly, it is used to cut straight across bangs with a little bit of the bang getting longer on the outside edges.

      Reply
  17. Miss A

    October 25, 2013 at 10:47 pm

    You are amazing. Seriously. I’ve been itching for a subtle swoop bang that I could do myself for a long time, but every time I try it comes out in uneven chunks attempting a slant. Why don’t all hairdressers hand out pamphlets up front about this “across the street” thing??? I read this instruction about 15 times before attempting, trying to figure out how that would help. They look amazing! Thank you!

    Reply
    • McKenzie

      October 27, 2013 at 8:56 am

      This just made my day! Thank you for the kind words! I think each hairdresser has just been taught differently, and once you learn, you don’t want to change I guess!

      Reply
  18. Ashlea

    November 9, 2013 at 7:19 pm

    Just did this, I was so nervous! I’m very happy!!!!

    Reply
  19. Kala

    November 18, 2013 at 9:50 am

    this is amazing! just saved me $$$$$ and they turned out perfect, even better then the last time I SPENT money getting them trimmed!

    Reply
  20. Heather

    November 20, 2013 at 5:11 am

    I did it, and it worked!!! Thank you so much!

    Reply
    • McKenzie

      November 20, 2013 at 9:54 am

      I am so glad!

      Reply
  21. red

    January 23, 2014 at 10:11 pm

    This is really interesting, You’re an excessively skilled blogger.
    I have joined your rss feed and look forward to in quest of more of your excellent
    post. Additionally, I have shared your web site in my social networks

    Reply
  22. Cora

    February 2, 2014 at 12:55 pm

    I tried this and it worked like a charm. Thank you!

    Reply
    • McKenzie

      February 2, 2014 at 3:32 pm

      So glad I could help!

      Reply

Trackbacks

  1. Sundae Scoop Top 20 I Heart Nap Time | I Heart Nap Time - How to Crafts, Tutorials, DIY, Homemaker says:
    April 27, 2013 at 6:36 am

    […] Miss Candiquik Faux Bois Dresser Makeover from Sew Craft Create How to cut side swoop bangs from Girl Loves Glam Rocker Makeover from The Winthrop Chronicles Wedding Day Emergency Kit from A casarella Dirt […]

    Reply
  2. Strut Your Stuff Saturday Link Party--Week 95 | Six Sisters' Stuff says:
    May 28, 2013 at 1:19 pm

    […]   How To Cut Your Own Side Swoop Bangs from Girl Loves Glam  […]

    Reply
  3. DIY Swoop Bangs | Home and Heart DIY says:
    September 10, 2013 at 4:04 pm

    […] Girl Loves Glam […]

    Reply
  4. How to Cut Your Own Split Ends - Girl Loves Glam says:
    March 17, 2014 at 6:00 am

    […] Makes sure to subscribe to my YouTube channel HERE and if you want another great hair cutting tutorial, check out my post on how to cut your own side swoop bangs HERE! […]

    Reply
  5. Frugal Living: 18 Tips on How to Live Like a Cheapskate! says:
    May 19, 2014 at 4:30 pm

    […] 18. Cut your own hair Okay, might be pushing the boat out too far with this one. But if you’re feeling brave or really poor – then give it a go. Source: girllovesglam.com […]

    Reply
  6. The 27 Stages Of Cutting Your Own Bangs | Doggy Viral says:
    January 27, 2016 at 4:09 am

    […] Via girllovesglam.com […]

    Reply

Leave a Reply Cancel reply

Your email address will not be published. Required fields are marked *

Primary Sidebar

About McKenzie
Color Street Store on www.girllovesglam.com

Footer

Privacy Policy

Copyright Girl Loves Glam © 2021 · Web Hosting By RFE Hosting